Final Fantasy Pixel Remaster 100% Walkthrough
This step-by-step guide will show you how to get everything and obtain every trophy in Final Fantasy.
Welcome to the 100% Walkthrough for Final Fantasy 1, now available in the Pixel Remaster version! This game marks the beginning of one of the most iconic RPG franchises in gaming history. Though it’s the oldest entry in the series, Final Fantasy 1 is still a fun and engaging experience, offering a simple yet rewarding gameplay loop.
In this guide, we’ll take you step-by-step through the main story, as well as all the side content needed to earn the Platinum Trophy. The trophies in this version of the game are relatively easy to unlock, and you'll likely unlock most of them just by progressing through the story. However, there are a few that require a bit of extra effort, such as completing the Bestiary (Field Research - Professional) and opening all 249 chests (Legendary Treasure Hunter). These will be covered in detail to ensure you don’t miss anything!
This guide follows a general flow-based format, so you can follow along without getting lost. We’ll point out important collectibles and battles, and help you achieve the 100% completion you’re aiming for.
Don’t worry if you do miss anything. Nothing is missable in this game, and you can come back later on.
There are a few interesting quality-of-life changes in this version that you should take note of:
You can press R3 at any point to Turn Encounters ON/OFF. This can be useful if you need to get back to an inn to heal and you don’t want to risk encounters. This, of course, does NOT work on Boss fights and battles in chests.
You can press L3 at any point to change from walking to running, so I recommend you change it to running as soon as you start. This will save a lot of time in the long run.
You can press Triangle to open the menu and save whenever you want with the “Quick Save” option.
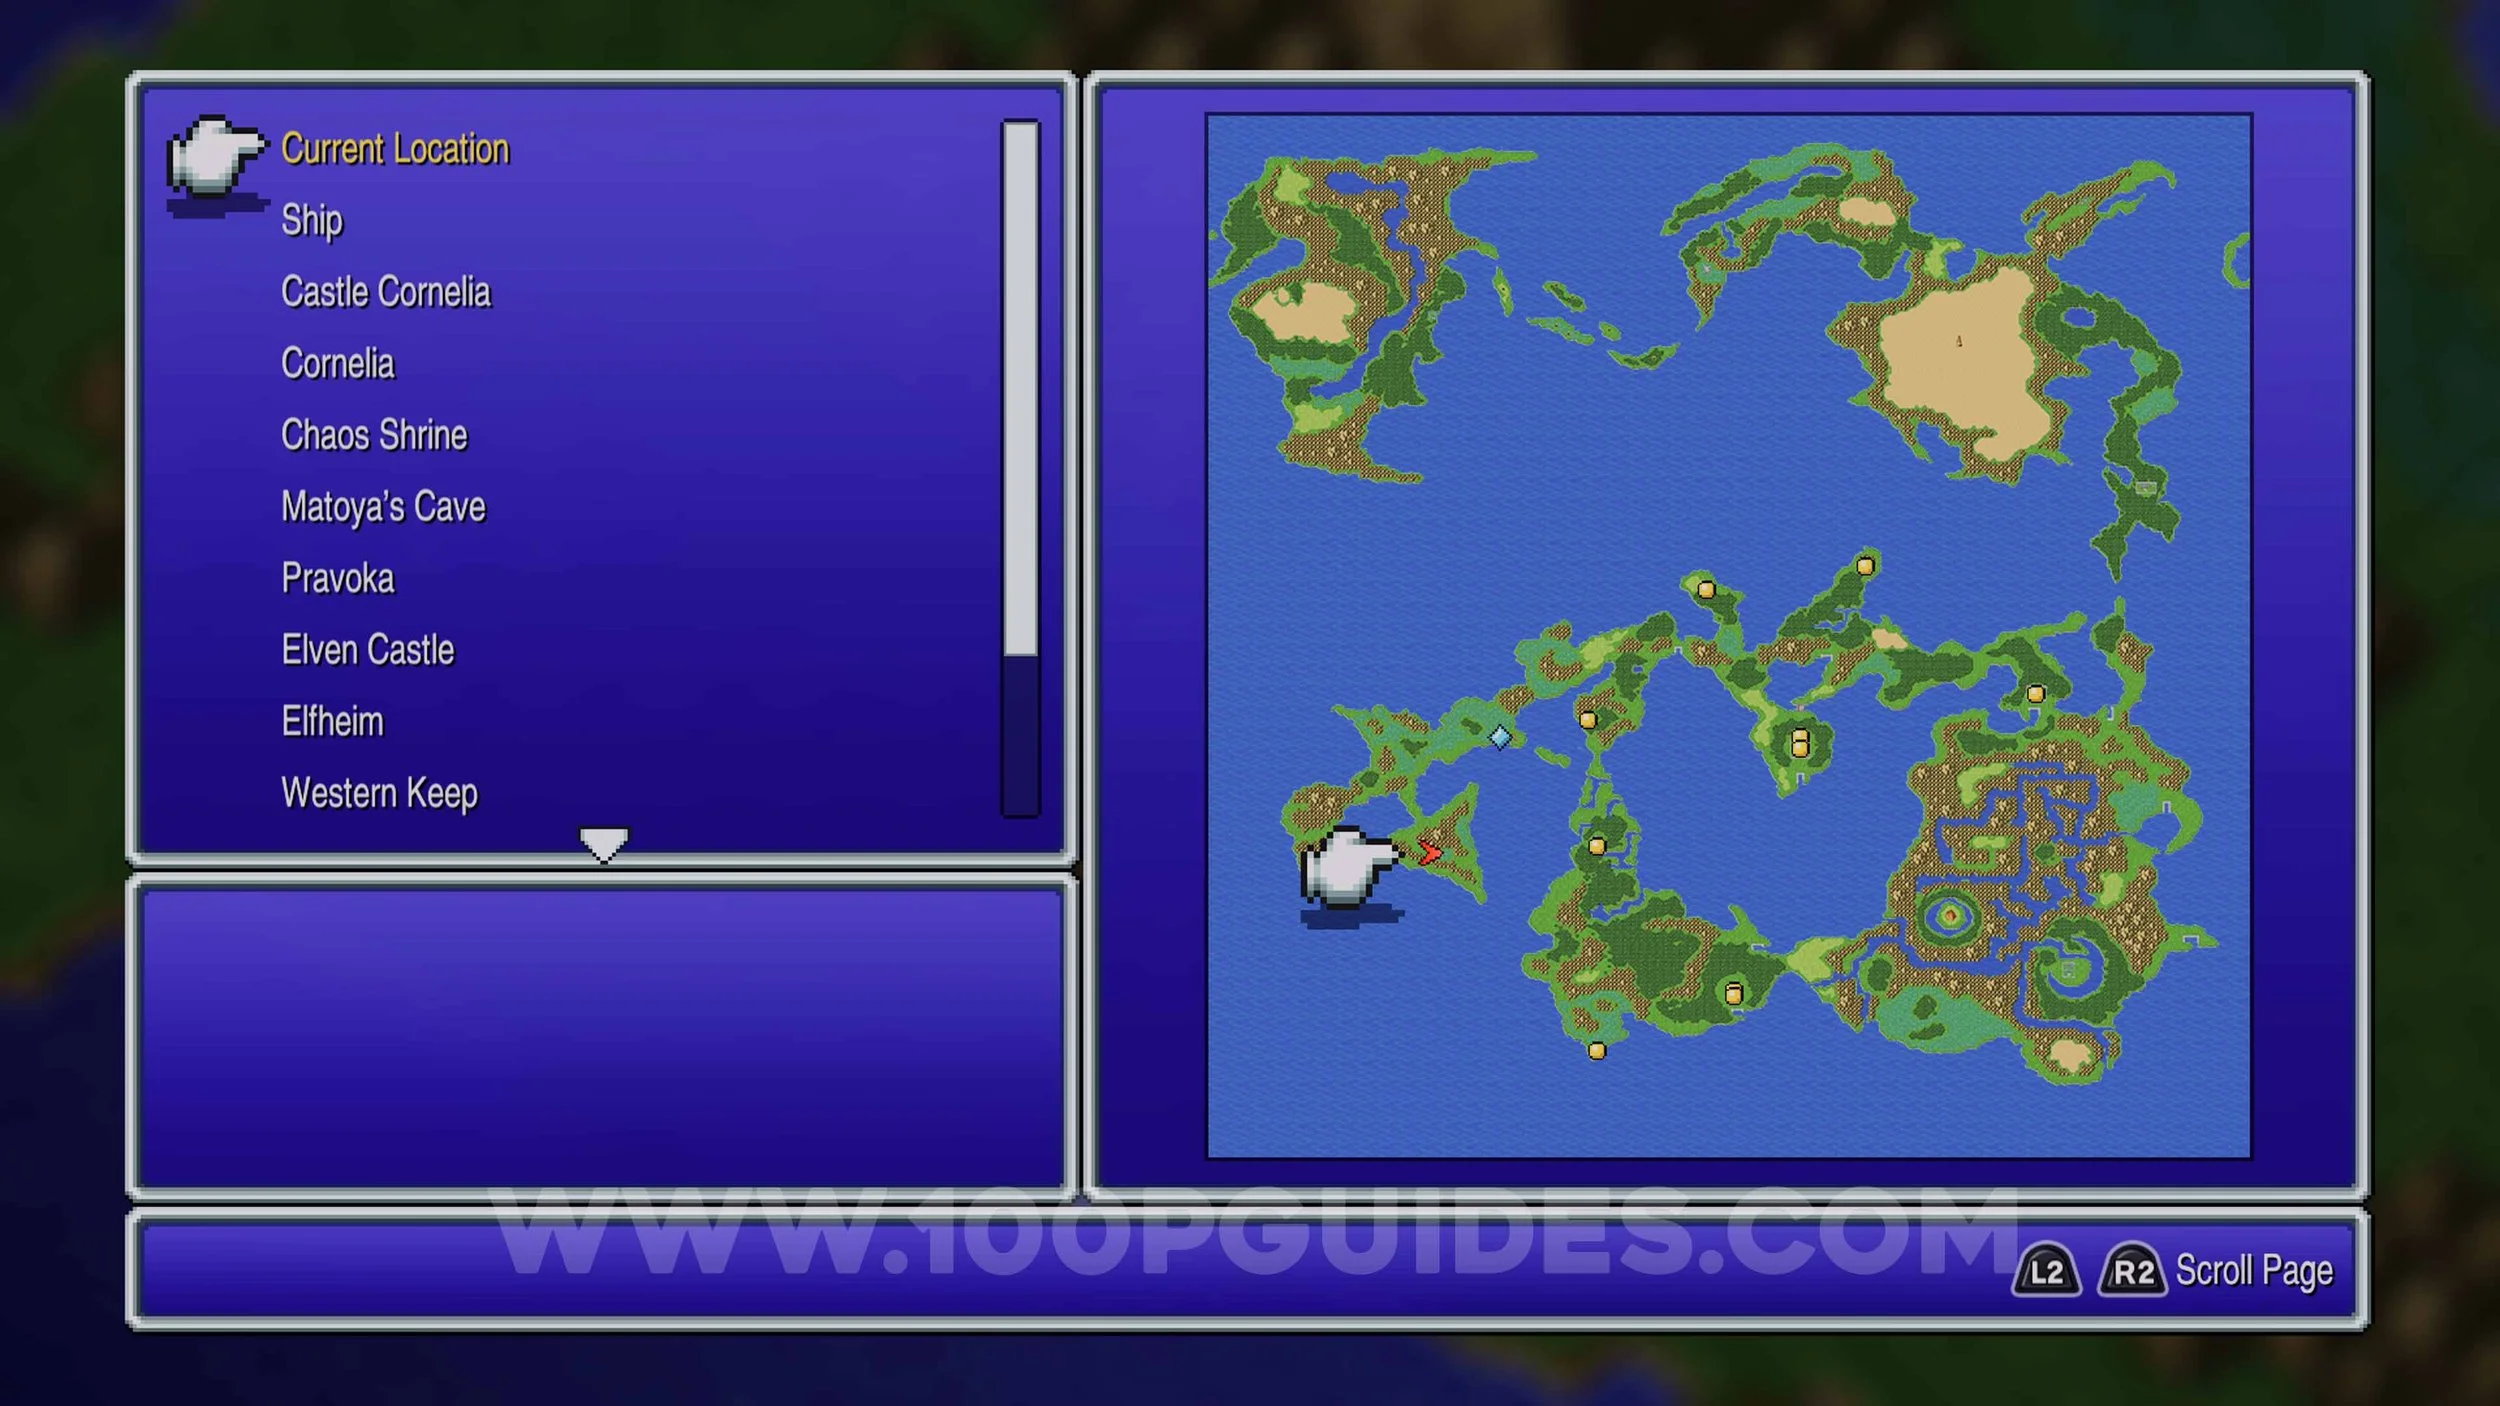
You can check your progress towards the Bestiary by pressing Triangle > Configuration > Bestiary.
You can check how many chests are available in each area through the world map by pressing Square.
With that said, let’s get started!
Creating Your Party
Unlike more modern Final Fantasy Games, at the start of Final Fantasy 1, you’ll be asked to create your own party from different characters. This may seem like a simple decision, but keep in mind that these choices are more about picking roles for your characters rather than specific people. You’ll be choosing from six different jobs (or classes), each with its own strengths and weaknesses.
You’re allowed to choose four characters for your party, and while there’s no “perfect” combination, here are a few tips:
White Mage: I strongly recommend including at least one White Mage in your group. Their healing magic will be crucial for keeping your party alive.
Black Mage or Red Mage: A Black Mage can cast powerful offensive elemental spells, making them great for dealing damage to enemies. Alternatively, a Red Mage is a solid choice if you want a character who can handle both offensive magic and melee combat. They’re not as powerful in either department as a pure Black Mage or a Fighter.
Fighter: You’ll also want at least one strong physical fighter in your group. Fighters (and later Warriors) have high attack stats and can take the hits, making them great for the front lines.
Castle Cornelia
After deciding on the 4 characters that will make up your team, you will start just outside Castle Cornelia. For now, let’s head inside, go north and up the stairs. Here, talk to the guard. He will take you to the king to get your first task. He wants you to go to the Chaos Shrine and save Princess Sarah.


There are a few chests in Castle Cornelia, but they are not obtainable until we get a key a little later on, so we will return then. For now, let’s leave and go to the overworld.
Castle Cornelia Outskirts
Before we proceed to our main objective, we want to prepare and address a few things first. We will want to level up a little to be prepared for the next area. This also gives us the chance to defeat 1 of each type of enemy in the Overworld area around Castle Cornelia and take our first steps towards the Field Research - Professional trophy.
In this area, we can fight the following enemies.
001 - Goblin
002 - Goblin Guard
003 - Wolf
004 - Crazy Horse
If you need to recover your HP while looking for these enemies, head into Cornelia (the town below the castle) and rest at the Inn. This is the first building on your left. And if someone gets KO’d, you can revive that character in the church found in the top right corner of Cornelia.


Cornelia
Once you have defeated at least one of each of the 3 enemy types and level up to level 5 or 6, head into the town of Cornelia. Make sure you use the church and the inn to heal the party to max HP. You should now also have a nice amount of GIL (money) to prepare your characters for the first main boss. Below you can see the available items in the multiple shops around Cornelia.
Cornelia Weapon Shop
- Nunchaku
- Knife
- Staff
- Rapier
- Hammer
Cornelia Armour Shop
- Clothes
- Leather Armour
- Chain Mail
Cornelia White Magic Shop
- Cure
- Dia
- Protect
- Blink
Cornelia Black Magic Shop
- Fire
- Sleep
- Focus
- Thunder
You can also purchase some potions and maybe even a phoenix down from the Cornelia item shop if you have some leftover GIL.
Once you have purchased a nice amount of upgrades for your characters, it’s time to head out again.
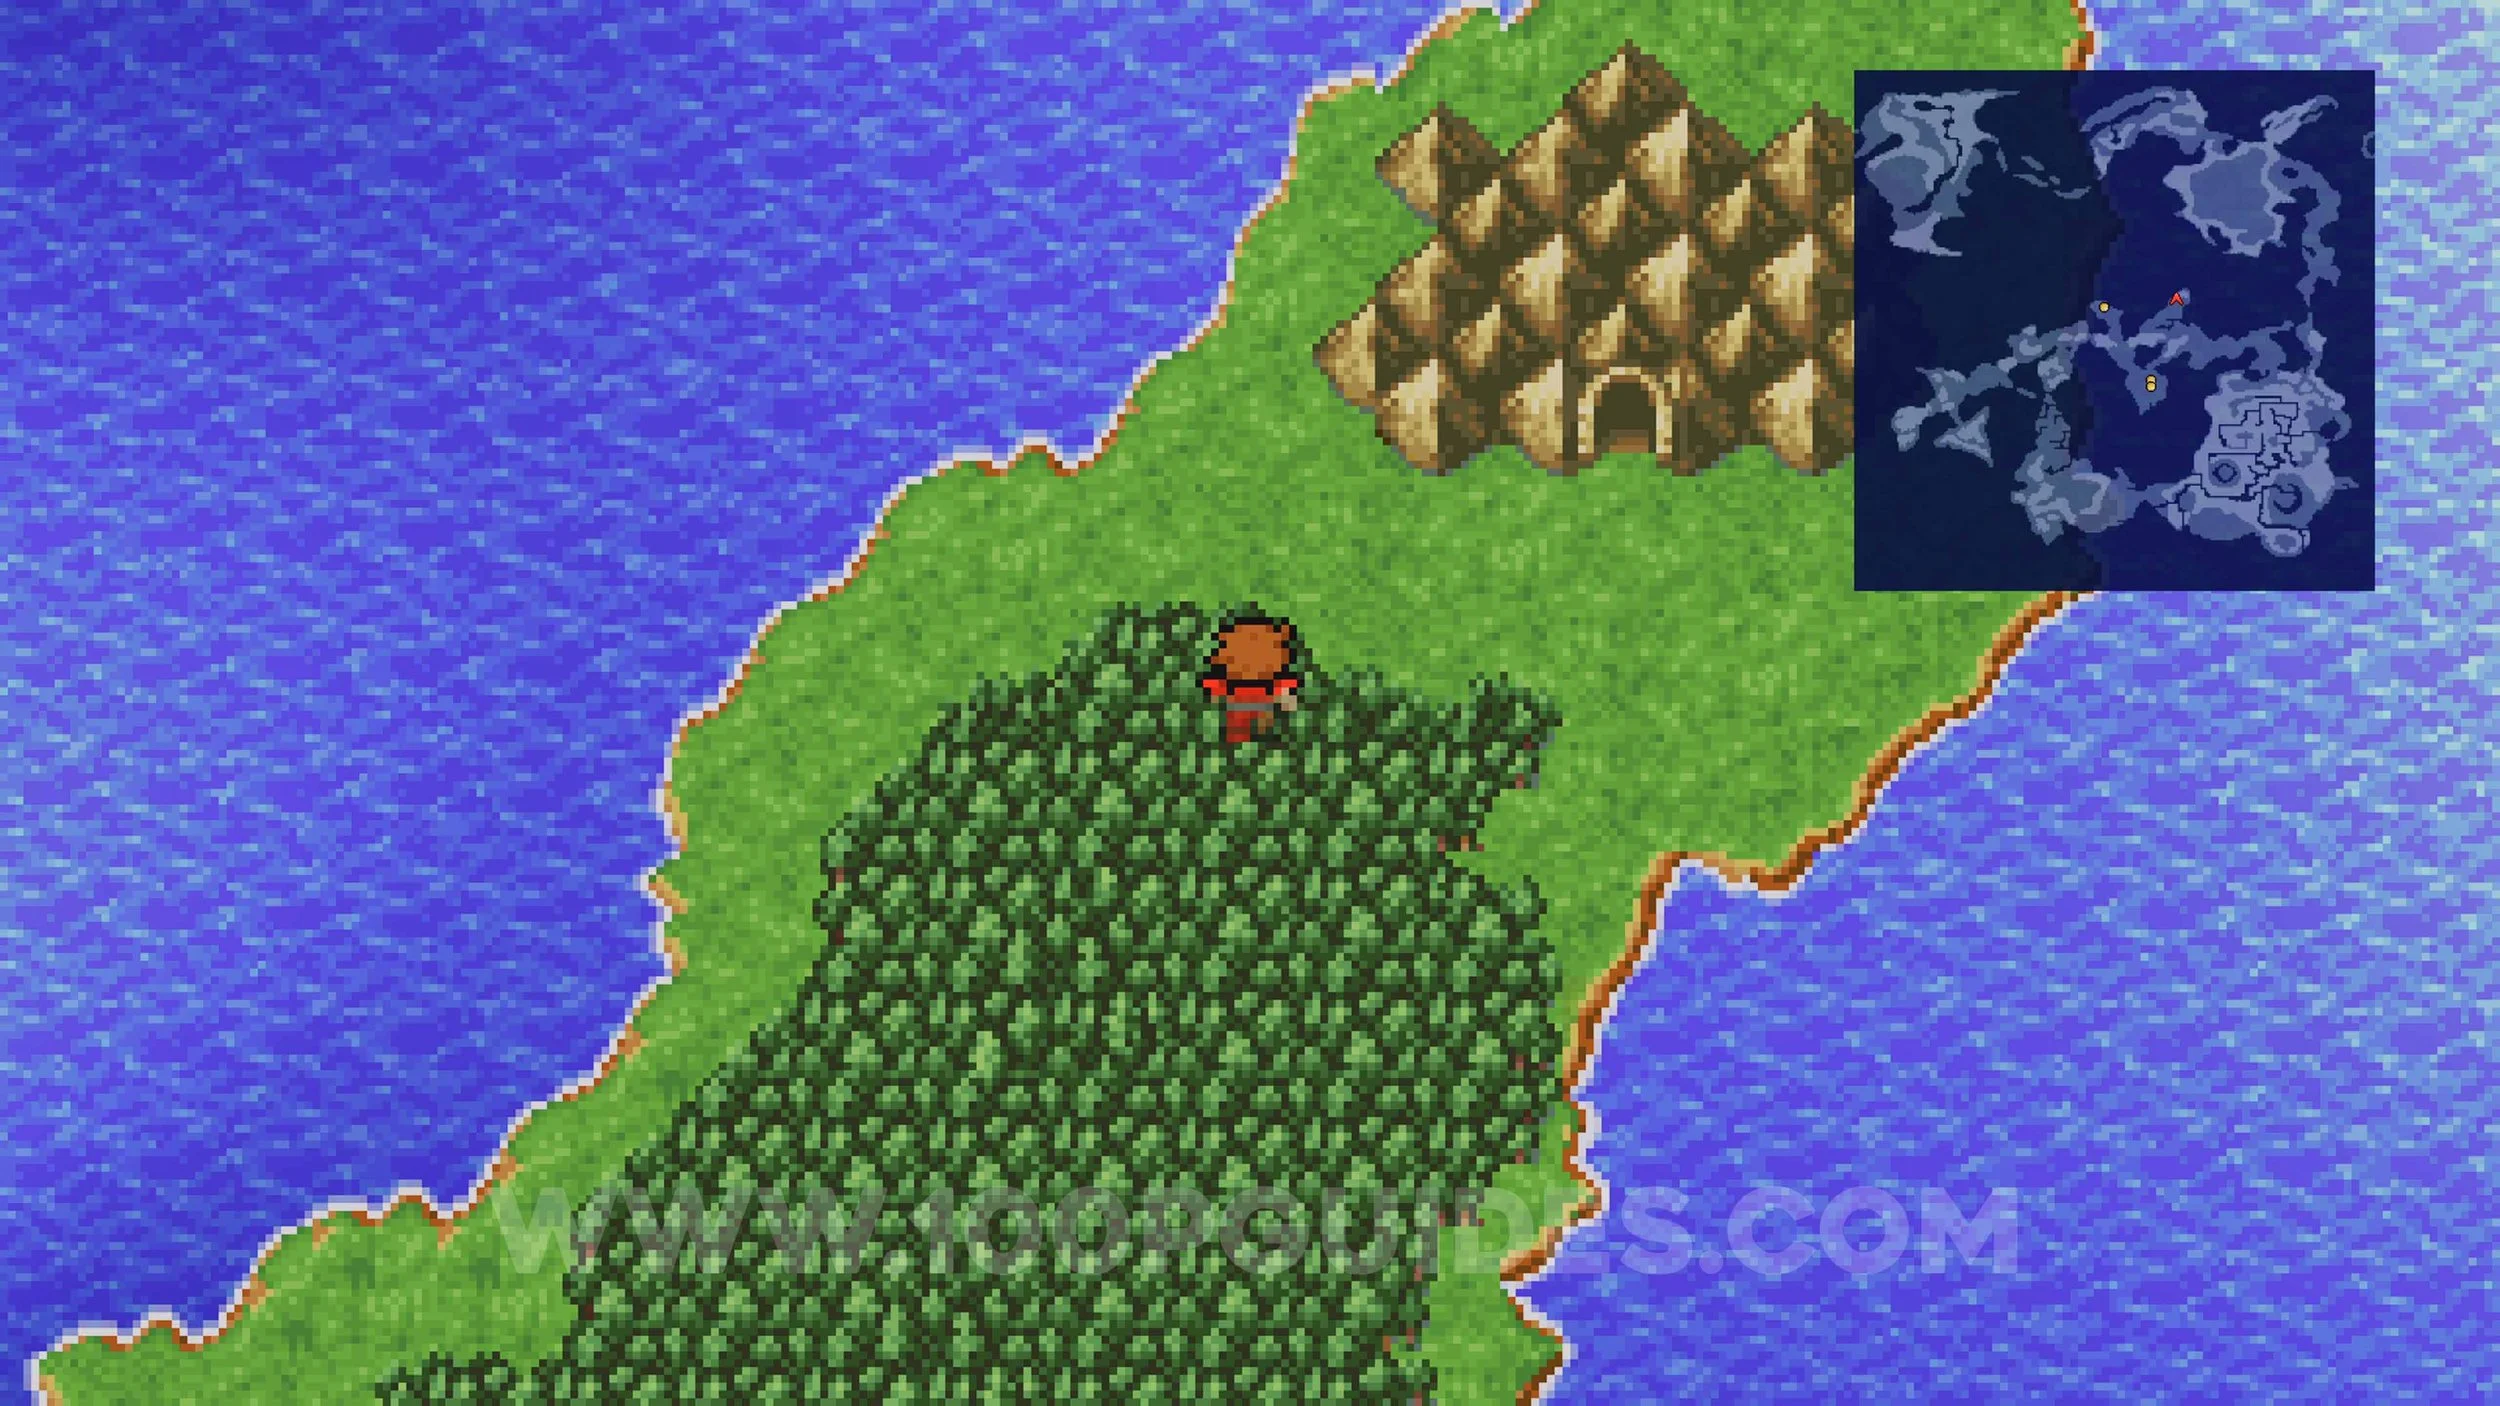
Chaos Shrine Outskirts
Once you leave Cornelia, head north to find the Chaos Shrine. Before we head in, you can fight two new enemies in the forest just outside the shrine.
005 - Skeleton
006 - Black Widow


Once you have defeated the two new enemies, head into the Chaos Shrine.
Chaos Shrine
Inside you we have a few things to do before facing the boss. In the first room, there are 3 chests we can pick up. One CHEST (1/249) in the small room in the southwest corner and two more CHESTS (2-3/249) in the small room in the northwest corner. There are more chests in this area on the eastern side, but we don’t have the key to those rooms yet.
There are also some new enemies for the Bestiary here:
007 - Gigas Worm
008 - Warg Wolf
009 - Werewolf
010 - Zombie
011 - Ghoul
Once you have defeated at least one of each new enemy and opened the 3 chests in the first room, it’s time to go through the door just north of the entrance to the shrine. Inside, you will fight 012 - Garland, the first boss of the game. If you have level 6 or higher, this will be easy. To be extra safe, keep one of your characters for healing the character that Garland attacks and then just attack with the other 3. The fight should be over in 4 or 5 turns. Once he is defeated, you will rescue the princess and get teleported back to Cornelia Castle, where you will report back to the king. You will also get the Lute (key item) from the princess before you leave.
The bridge to the north of Cornelia will now be rebuilt, allowing you to explore the northern lands.

Area To The North Of The Bridge
Before leaving, make sure you rest up at the inn in Cornelia and purchase a few healing items from the item shop since some of the enemies we can encounter in the next area are strong.
After crossing the rebuilt bridge to the north of Cornelia, head all the way to the north to find Matoya’s Cave.
Matoya’s Cave
Once inside, head through the only available door. In the next room, talk to the NPC and then open all 3 CHESTS (4-6/249).


Area To The North Of The Bridge
After leaving Matoya’s Cave, you can find the following new enemies for the Bestiary in the forest just outside:
013 - Cobra
014 - Ogre
015 - Ogre Chief
016 - Lizard
Once you have defeated one of each new enemy, head to the east and enter the town of Pravoka.


Pravoka
Head into town and go to the Inn to heal from the journey here. If you defeated enough enemies on the way, you should have enough GIL to upgrade your characters by purchasing spells and weapons from the shops in town.
Pravoka Weapon Shop
- Hammer
- Broadsword
- Battle Axe
- Scimitar
Pravoka Black Magic Shop
- Blizzard
- Dark
- Temper
- Slow
Pravoka White Magic Shop
- Blindna
- Silence
- Nulshock
- Invis
Pravoka Armour Shop
- Leather Armour
- Chain Mail
- Iron Armour
- Leather Shield
- Leather Gloves
Once you are ready, head to the group of pirates in the northwest corner of Pravoka to start another boss fight against some 017 - Pirates. If you are anywhere near the level I was (level 10), this fight will be a walk in the park.
After defeating them you will get your ship, allowing you to explore the open seas!
Heal up at the inn if you need and exit Pravoka to find your new ship waiting outside.
Inner Southern Sea
Get in your boat and set sail to the sea to the west of Pravoka. Here, sail around and defeat the following new enemies for the Bestiary:
018 - Sahagin
019 - Sahagin Chief
020 - Buccaneer
021 - Shark
022 - Bigeyes


Once you have defeated at least one of each of the new enemies, head to the south and dock your boat. Then enter Elven Castle.


Elven Castle
Once you arrive at the castle, head through the door in the northwest corner to find the prince who has been cursed by Astos and needs waking up. To dispel this curse, you will need to get the Crystal Eye and give it to Matoya, who can help. But before that, we will need to get a few other things first. And in case you are wondering about the 3 chests in the top right corner. Yes, you guessed it, the door is locked, and we will be returning later.
Elfheim
For now, head out of the castle and into Elfheim (the red buildings just below the castle). Go to the church and rest up if needed. Then take a look at the shops around town to upgrade your characters. I recommend picking up Fira, Thundara and Blizzara if you have a Red or Black mage since these spells affect all enemies. You can also pick up Heal for your white mage to heal the whole party. I also recommend you buy a fair share of Antidotes from the item shop since you will be getting poisoned a lot in the next area.
Elfheim Weapon Shop
- Iron Nunchaku
- Dagger
- Crosier
- Saber
Elfheim Black Magic Shop
- Fira
- Hold
- Thundara
- Focara
Elfheim White Magic Shop
- Cura
- Diara
- NulBlaze
- Heal
Elfheim Armour Shop
- Iron Armour
- Copper Armlet
- Iron Shield
- Leather Cap
- Helm
Elfheim Northwest Black Magic Shop
- Sleepara
- Haste
- Confuse
- Blizzara
Elfheim Northwest White Magic Shop
- Poisona
- Fear
- NulFrost
- Vox
Western Keep
Head out of Elfheim and, for now, proceed directly to Western Keep, located to the northwest. Here, enter the room in the middle and talk to the king. He will want us to retrieve his crown from Marsh Cave.


The chests in Western Keep are also behind a locked door. So, for now, we will be leaving.
Marsh Cave Outskirts
Head to the southern point of the area to find Marsh Cave. However, before going in, there is one new enemy you can find just outside:
024 - Ghast


Marsh Cave
Once you find and defeat a Ghast, head inside.
First, head north and go down the stairs at the end. In the next area, you can find 4 CHESTS (7-10/249) around the 3 smaller rooms.


Once you open the 4 chest, head back up to the first floor. This time, go south and enter the room at the bottom to find the ladder that takes you down to another room. Take the ladder and open the 3 CHESTS (11-13/249) found in the 3 small rooms in the southwest corner.
Hello, World!
After collecting everything from the 3 chests, head through the empty room on the bottom right to find a ladder that takes you down to B3. Here you will find a lot of small rooms with chests. At this moment, you can collect 8 CHESTS (14-21/249) in this room (the 3 top rows of rooms). For the bottom rooms, we will return soon. You will also get attacked by some 032 - Piscodemon when opening one of the chests (still counts as a chest) that gives you the Crown we come here to look for.


Now that we have the Crown, we can leave. Just make sure you defeat the following new enemies in Marsh Cave for the Bestiary:
023 - Tarantula
025 - Scorpion (B2 & B3 only)
026 - Shadow
027 - Green Slime
028 - Crawler (B2 & B3 Only)
029 - Gray Ooze
030 - Gargoyle (B2 & B3 Only)
031 - Bloodbones (B2 & B3 Only)
After defeating every one of those enemies at least once, head back to Western Keep. NOTE: We will be facing a boss once we get there so if you need to heal, head back to Elfheim first!
Western Keep
Once you're ready, head back to Western Keep and give the Crown back to the king. He will then reveal that he is the 033 - King Of The Dark Elves, Astos.
This boss should not be too hard if you are around level 15 or 16. He does have high defence against everything and does not have any weaknesses. He can also cast sleep on you and cast Death spell that can instantly KO any party member.


Once you defeat him, you will get the Crystal Eye key item.
Matoya’s Cave
Use your ship to return to Matoya’s Cave and give Matoya the Crystal Eye. You will then receive the Jolt Tonic key item needed to continue.
Elven Castle
Take the Jolt Tonic to the prince at Elven Castle to get the Mystic Key. This is the key that will finally let us open all those locked doors with chests inside. So we will now be cleaning up all the chests from the previously locked areas.
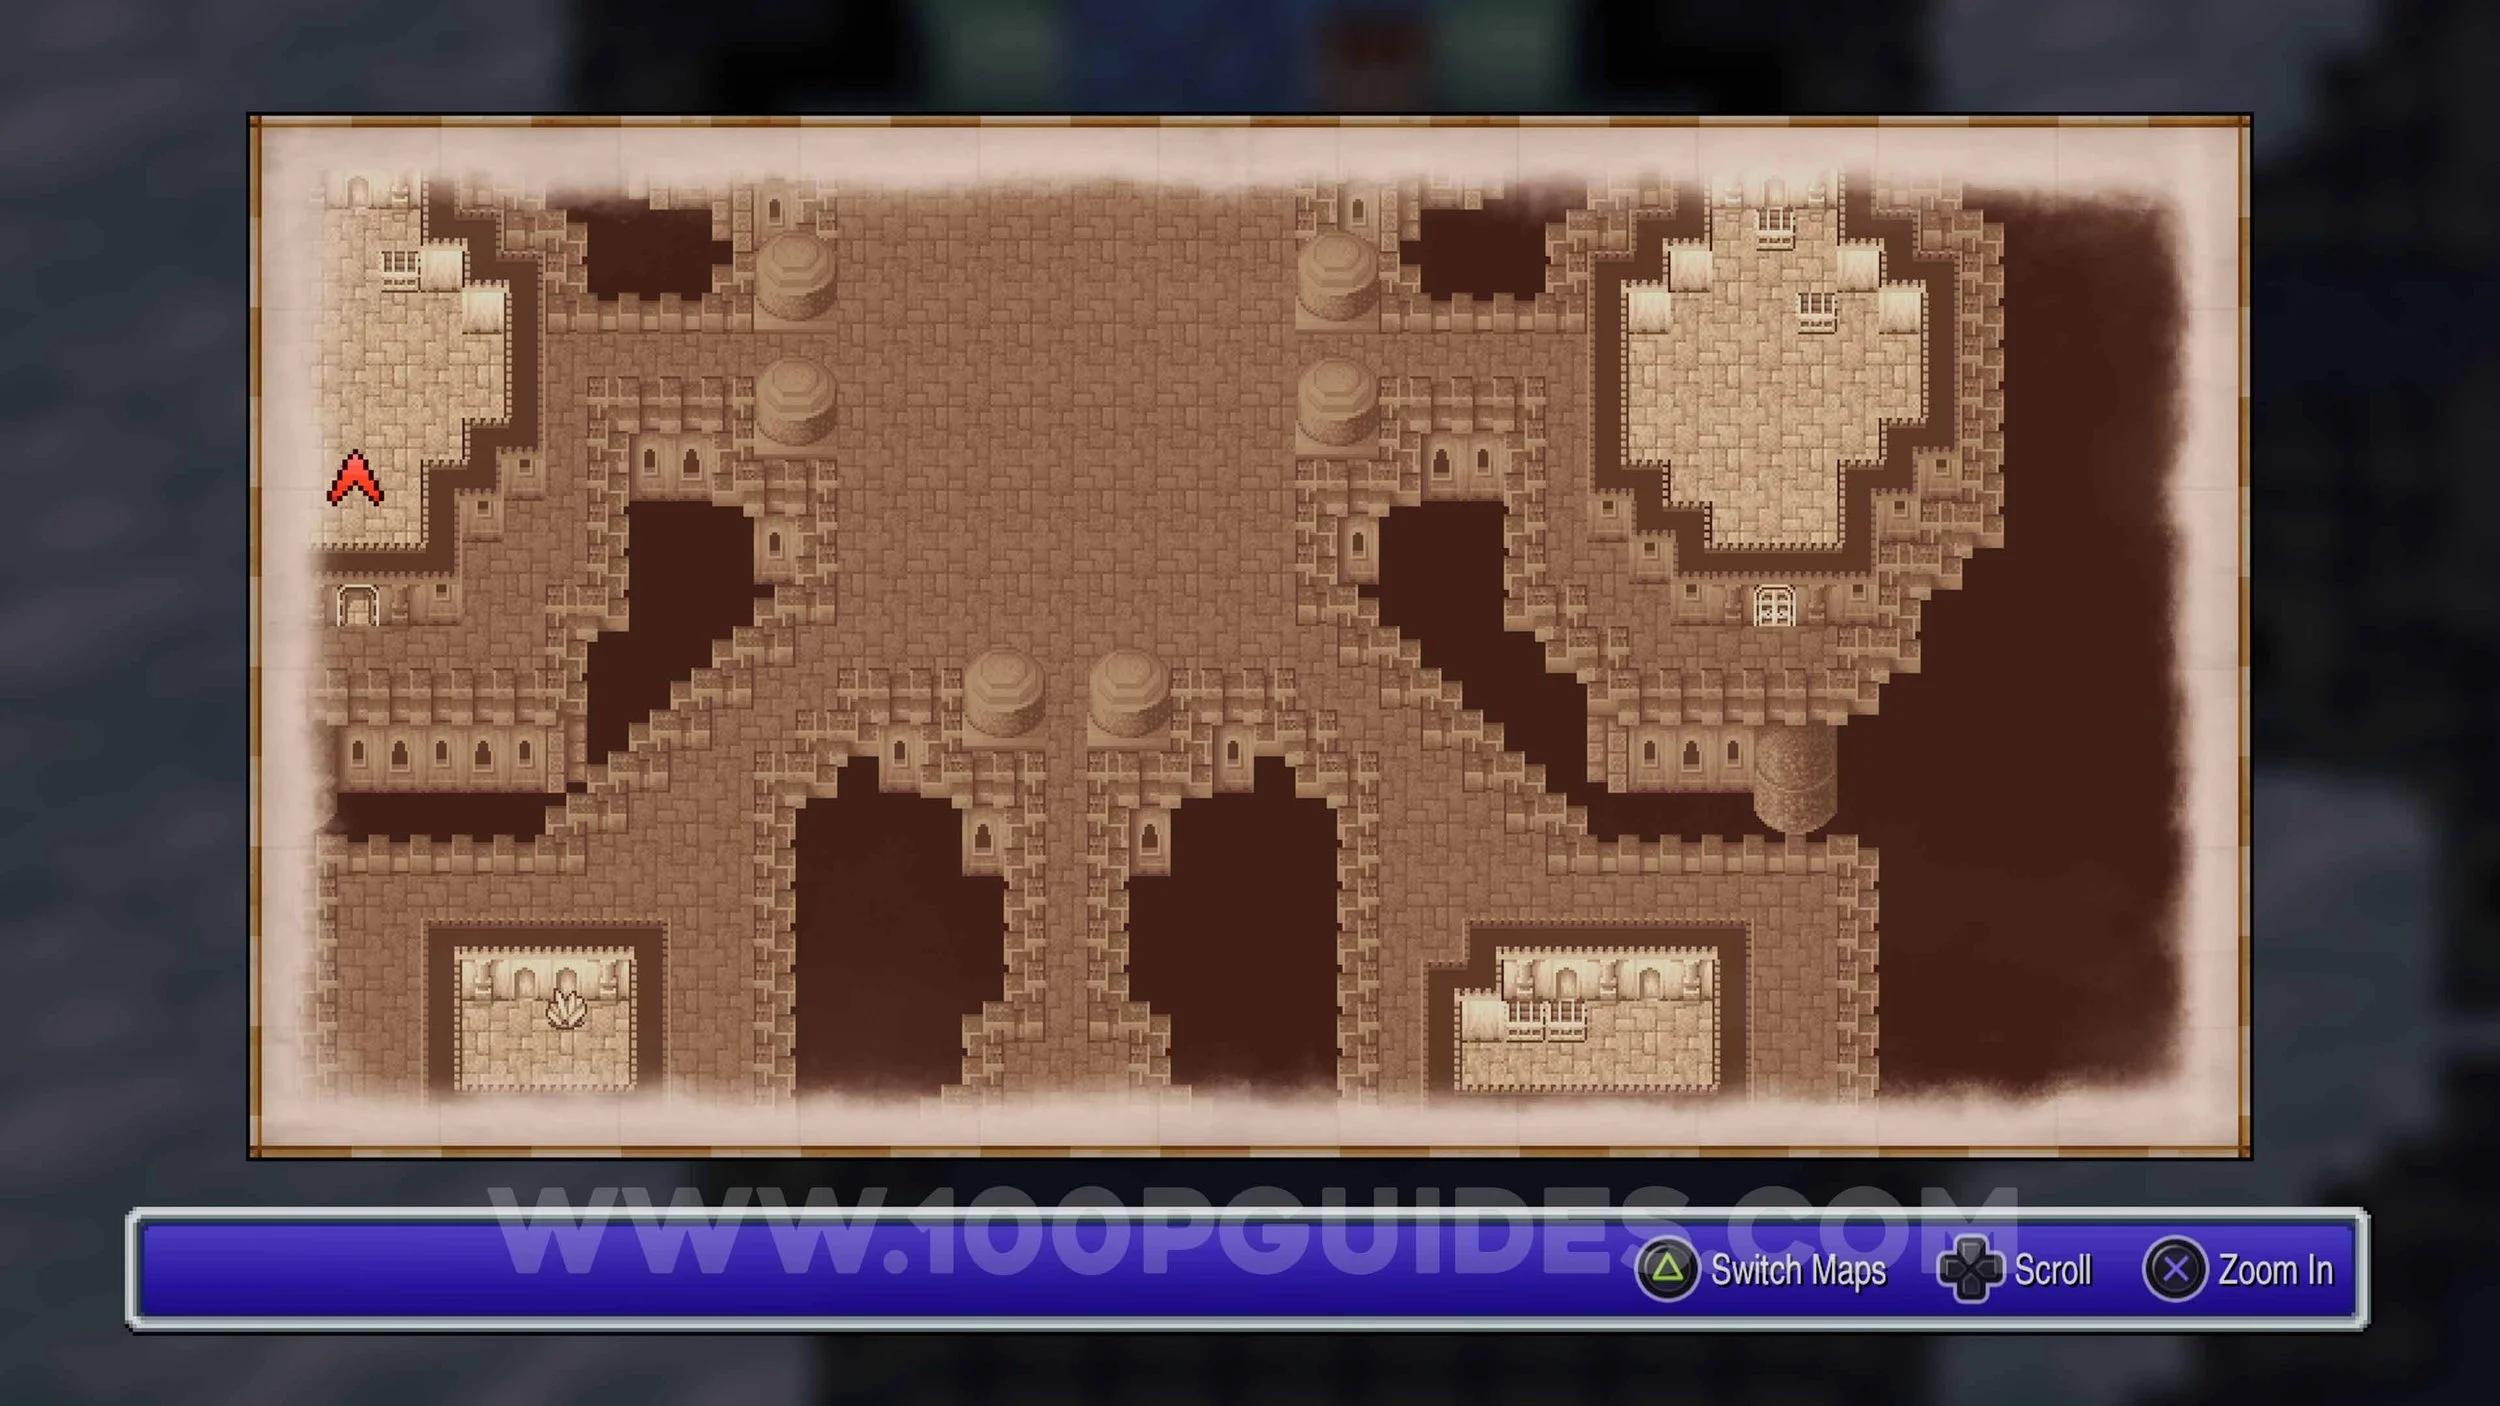
Castle Cornelia
Let’s start by going back to where the game started and getting the 6 CHESTS (22-27/249) from Castle Cornelia. They can be found in the 2 rooms in the top right corner. To get there, take a left or right at the entrance of the castle and go to the top by taking one of the outer paths. One of these chests contains the Nitro Powder that we need for the main story.
Chaos Shrine
To continue cleaning up previously unobtainable chests, let’s head back to the Chaos Shrine. You will now be able to get the CHEST (28/249) from the bottom right room and the 2 CHESTS (29-30/249) from the top right room in the first area.


I’m sure you have noticed that the in-game counter for Chaos Shrine shows 13 chests. Don’t worry, we can’t get the other 7 until later on.
Western Keep
Next up, return to Western Keep and open the 3 CHESTS (31-33/249) from the room to the left. Be cautious since all 3 of these chests will contain battles. The good news is that you will register 034 - Mummy and 035 - Wraith to the Bestiary.
Marsh Cave
The next area we want to clear up is Mash Cave. You will now be able to get the last 3 CHESTS (34-36/249) in this area. They are found in the 3 rooms at the bottom of 3B. These chests contain battles. For one of them, you will face some 036 - Anaconda.
Elven Castle
The final area with chests locked behind a door that requires the Mystic key is in Elven Castle. From the entrance, go right and then to the room at the top outside the castle walls. This room contains 4 CHESTS (37-40/249).
It’s now time to continue with our adventure. You will now want to get on your ship and dock it to the northwest of Cornelia Castle. Then walk to the southwest to find Mount Duergar.


Mount Duergar
Once inside, first head into the room above the entrance and open the 2 CHESTS (41-42/249).
Now head down to find another room that contains the other 8 CHEST (43-50/249) inside.
Just outside the room with the previous chests you can find an NPC. Talk to him and give him the Nitro Powder to open up a gap in the land that will allow you to take your ship out of the inner sea.
Before leaving, you can also talk to the NPC in the northernmost room. He will tell you to look for some Adamantite. This is actually what we need to get the best weapon in the game, so we will return to this later.
Before you continue, now would be a good moment to check your character’s equipment. After opening the latest chests, you should have some nice new equipment. You can go to the equip menu, select a character and then press right on the d-pad to go to “optimal”. Use this option on every character if you quickly want to equip the best equipment.
To continue, get back on your ship and go through the new gap in the land to the west (just below Mount Duergar). Then look for a small village to the northwest where you can dock your ship.


Melmond
Enter Melmond (the small town to the right of where you dock your ship).
Like always, let’s go through what you can get to upgrade your characters at the shops in town. You should at least get Healara and Life for your white mage and maybe a Silver Armlet. If you have saved a lot of GIL, you could also get the Knight’s Armour.
Melmond Weapon Shop
- Crosier
- Saber
- Longsword
- Falchion
Melmond Armour Shop
- Knight’s Armour
- Silver Armlet
- Great Helm
- Bronze Gloves
- Steel Gloves
Melmond White Magic Shop
- Curaga
- Life
- Diaga
- Healara
Melmond Black Magic Shop
- Firaga
- Scourge
- Teleport
- Slowra
After doing some shopping, you can talk to some of the NPCs in town to learn that a Vampire attacked. Then you can head back out to the overworld.
Outside Cavern Of Earth
From Melmond, head west and then south and cross the thin path of earth that takes you down to the triangle-shaped peninsula. Here you will find the Cavern of Earth. Before heading inside, walk around the area to find two new enemies for the Bestiary.
037 - Hyenadon
038 - Lesser Tiger


After defeating those 2 new enemies, head inside the Cavern Of Earth.
Cavern Of Earth
Once inside, first get the 5 CHESTS (51-55/249) on this floor (one in the northern room and two in each of the southern rooms). 4 of the 5 chest will start a battle against a 041 - Earth Elemental.


After opening the 5 chests on the first floor, head to the right side and take the stairs to the next floor. On this floor, there are 2 more rooms with chests. One through the door in the upper right corner and one through the door in the bottom left corner. These contain a total of 6 CHESTS (56-61/249).


Once you have collected every chest on that floor, head to the right and take the stairs to the next floor. On this floor, you can find a total of 5 CHESTS (62-66/249). One in the room to the right of the entrance, another in the room just above it, one in the room in the upper centre, one in the little room on the left of the floor and a final chest just above the stairs that you used to enter this floor (you will have to go all the way around the floor to get this one).


As you enter the room to get the final chest on this floor (the one above the entrance), you will have to defeat the 046 - Vampire boss. He hits hard but can be defeated easily by using Dia if you have a White Mage and Fire attacks. In the chest he is guarding, you will get the Star Ruby. This key item is needed to advance the story.


For now, we will not be able to continue to the remaining floors in this dungeon. We will be back soon for that. If you want, you can take out the following new enemies for the Bestiary before you leave.
039 - Minotaur (B1 & B2)
040 - Hill Gigas
042 - Troll (B2)
043 - Wight (B3 & B4)
044 - Ochre Jelly (B3 & B4)
045 - Cockatrice (B3 & B4)
Once you are done defeating enemies, leave the cave and head north and then west to find the Giant’s Cave.


Giant’s Cave
Head inside and talk to the Giant. Since you have the Star Ruby, he will let you pass.
Before leaving through the other stairs, you can find 4 CHESTS (67-70/249) in the room to the south.


Once you open the 4 chests, use the stairs on the left side of the cave to exit. Then go south to find the Sage’s Cave.
Sage’s Cave
Inside, go to the room on the left to find the Sage. Talk to him to get the Earth Rod. This will allow you to access the final 2 floors in the Cavern of Earth.


Cavern Of Earth
Now that you have the Earth Rod, head back to the Cavern of Earth. If you need healing, head to the Inn at Melmond first.
Once back in the Cavern Of Earth, head down to B3 and go through the room where you defeated the Vampire. You can now interact with the stone on the floor to open up the stairs to B4.
On B4, you can find the final 8 CHESTS (71-78/249) of this dungeon. 5 can be found in the room to the north, and the other 3 are in the room in the bottom left corner of the floor. While opening these chests, you will also fight 047 - Ogre Mage & 048 - Sphinx.


Once you have opened every chest on B4, head down the stairs in the top left corner of the floor to get to B5. Here, head through the door on the left to encounter 049 - Lich. This boss can be a bit of a difficulty spike if you don’t have a high enough level. I recommend being at least level 20 before facing this boss. He has very high defence against almost everything, and he will cast spells at the whole party at once. He is weak against Fire and Dia. So it’s recommended to have a White Mage and Red/Black Mage on your team.


Once you defeat the boss, you will have restored your first Crystal!. Now, interact with the yellow portal to get teleported to the overworld. Then head back to Melmond to heal up!
Traveling To The East
It’s time to set sail again. This time, we want to go all the way to the eastern reaches of the map. You can get there by sailing around the south of the continent or just keep going west until you leave the map. Once there, look for a small piece of land reaching eastwards where you can dock your ship. From ther,e walk to the small town in the centre of the Crescent Moon-shaped lake to the southwest.


Crescent Lake
Once inside the village, rest at the inn if you need to and then look around the shops. There are a few interesting things we can pick up in this town; however, for some of them, you will have to wait until your White Mage becomes a White Wizard (for things like Exit), and if you have a Red Mage, you will also have to wait until he becomes a Red Wizard (we will cover how to upgrades the classes later). If you have a Black Mage, you should be able to pick up Thundaga and maybe Quake. As for equipment (weapons and armour), you can find everything Mythril-related in this town. They are good, but not needed since we will get some better stuff from chests soon.
Crescent Lake White Magic Shop
- Stona
- Exit
- Protera
- Invisira
Crescent Lake Black Magic Shop
- Thundaga
- Death
- Quake
- Stun
Crescent Lake Weapons Shop
- Mythril Knife
- Mythril Sword
- Mythril Hammer
- Mythril Axe
Crescent Lake Armour Shop
- Mythril Mail
- Mythril Shield
- Buckler
- Mythril Helm
- Mythril Gloves
Once you have finished resting and purchasing upgrades, head across the bridge in the upper right corner of the village and talk to the sage to the right of the NPC in blue to get the Canoe. Note: He will only give it to you if you have defeated the Lich boss.


Crescent Lake Outskirts
Now that we have the Canoe, we can leave town. With this, we will be able to traverse the rivers in the area. Before we do that, make sure you take out at least one 050 - Ankheg just outside the Crescent Lake town.


Once you have defeated 1 Ankheg, hop into the river with the Canoe. In the river make sure you take out one of each of the following new enemies:
051 - Piranha
052 - Red Piranha
053 - Crocodile
054 - White Croc
055 - Ochu
056 - Neochu
057 - Hydra


After defeating the new enemies in the river, follow the river north and then west to get to Mt. Gulg (the volcano looking place).


Mt. Gulg
On the first floor of the dungeon, there isn’t much to do. Just go to the stairs in the upper left corner to access the next floor (note that you will take some damage from the lava).
On the next floor, go through the door to the north to enter a maze filled with a total of 18 CHESTS (79-96/249). They have a nice amount of GIL, weapons and equipment inside, and of course, a nice amount of chests with Monsters inside, allowing you to tick off 060 - Fire Elemental & 062 - Lava Worm from your Bestiary. Once they are all opened, head out of the maze through the central doors at the bottom and then go to the left and use the stairs to get to the next floor.
The next 3 areas do not have chests. So make your way through them as fast as possible. They all have lava that will damage you, but just open the map first to see where the stairs to the next floor are located and go straight to them.
Once you get to B4 (for the second time), you will have multiple rooms with chests. A total of 15 CHESTS (97-111/249) can be found on this floor. While opening these chests, you will also fight a few 064 - Fire Lizard.


Once you have opened all 15 chests, head down the stairs in the lower right corner of the floor to advance.
On the final floor, you can find the last 4 CHESTS (112-115/249). One in the room on the left, one in the top right room, one in the room to the right and one in the bottom right room. When opening the chest in the left room, you will also battle a 066 - Red Dragon.


After opening the chests, it’s time to go to the bottom left room and face 067 - Marilith, the boss of this dungeon and the one guarding the Fire Crystal. This boss can hit hard, so cast Protera on your party as soon as possible. She also does not have any weaknesses, so buff your team’s damage as much as possible. You also have a low chance of stunning her with Quake or Hold.


Once you defeat her, a teleporter will appear, allowing you to leave the dungeon. Before doing this, make sure you have defeated at least one of the new Bestiary entries.
058 - Horned Devil (B1 & B2)
059 - Pyrolisk (B2 & B3)
061 - Fire Hydra (B2-B4)
063 - Hellhound (B3 & B5)
065 - Fire Gigas (B4 & B5)
Road To The Cavern Of Ice
After leaving Mt. Gulg, head back to your ship and sail to the north, where you will find another place you can dock your ship in a Bay.


From here, use the canoe to travel down the river on your left. Then take the river north and then west to get to the entrance to the Cavern Of Ice.


Cavern Of Ice
In the dungeon, take the only path possible by taking the only stairs available until you go to B3 and then return to B2. Here you will soon get to a room with cracks on the floor, 2 chests and a stone in the middle. Open the 2 CHESTS (116-117/249) without stepping on any cracks. One of the chests will also start a battle against a 074 - Dark Wizard.
After opening the 2 chests, stand on any of the cracks to fall down to the floor below. Then defeat the enemy group that includes a few 072 - Specter (weak to Dia) to exit the small room. In this next area, you can find a total of 8 CHESTS (118-125/249). Two in the upper left room and 6 in the room at the bottom of the floor. When opening these chests, you will also fight 068 - White Dragon and 069 - Winter Wolf.


After opening the chests on this floor, use the stairs on the right of the floor to go up to the next area. Here, leave through the door to find the first of the final 5 CHESTS (126-130/249) of this dungeon. The others can also be found in rooms on this floor, and they contain a lot of GIL (and surprisingly no enemies).
After opening the chests, stand on the single crack on the floor in the room with 3 chests to get to the Levistone where you will have to defeat the 075 - Evil Eye. If you want to leave and heal before you do this, exit the room with 3 chests and take the stairs in the upper right corner.


Once you defeat the Evil Eye and get the Levistone, stand on any of the cracks and then make your way back to the floor where you used the single crack in the room with 3 chests. This time, use the stairs in the upper right corner to leave the dungeon. Just make sure you have defeated at least one of each of the following enemies for the Bestiary:
070 - Mindflayer (B2 & B3) - This enemy is rare in this dungeon and can be found more easily in the next.
071 - Ice Gigas (B2 & B3)
073 - Remorazz (B3)
Obtaining The Airship
Once you leave The Cravern of Ice with the Levistone, get on your ship and sail down to the small desert in the bottom right corner of the continent. You can leave the big ship at the end of any river and get in your canoe even if there is no port.


Take the river down and enter the small desert to obtain the Airship.
With the airship, you can now travel anywhere you want, as well as have an easy way to travel back to any areas where you may have missed anything.
Citadel Of Trials
With the freedom of the airship, we will now take the steps needed to upgrade our classes.
First, head to the Citadel of Trials. This can be found in the centre of the top continent.


Just note that you may not be able to land right next to the dungeon since you can only land on grass. Look for any area to the north and then walk down to the Citadel. As you walk down, you can find the new enemies to register in the Bestiary:
079 - Wyrm
082 - Basilisk
084 - Weretiger
Once you are done with those 3 enemies, head into the Citadel and talk to the NPC inside. Give him the crown, and this will unlock the door in the top left of the Citadel. Enter it and interact with the throne to get teleported to another room. In this dungeon, you will have to take teleporters to move around and advance. I will walk you through it, but if ever in doubt, ALWAYS take the lowest teleporter if there is more than one. To start, just follow the path and use the only portals available to you until you get to a room with 2 portals in it. In this room, use the lower of the 2 portals. After this room, continue and go through the only portal available. You will then come to another room with 2 portals. This time, take the bottom-right portal to continue. In the next room, just follow the hall down and enter the only portal at the end. You will then be in another room with 2 portals. Take the one on the right side.
In the next area, you can find your first CHEST (131/249) in the room in the top-right corner.


Next, head south down the left hall and take the second portal you come to (the one close to the left side wall).
In the next room, head up the stairs to get to 3F. Head north and through the door, where you will have to fight some 091 - Nightmare. You will also find the other 9 CHESTS (132-140/249) around this room. When opening one of the chests in the bottom left corner, you will also fight some 090 - Clay Golem. From the chest in the top-right room, you will get the Healing Staff that can be used to heal the team. And from the final chest, you will get the Rat’s Tail, the main reason we come here. This is the key item that will soon allow us to upgrade our character classes.


To leave, interact with the enemy next to the last chest and defeat the 092 - Dragon Zombies.
If you didn’t defeat at least one of each of the following enemies, head back in (or at least remember to return later):
070 - Mindflayer (2F & 3F) - If you didn’t find one in the Cavern of Ice.
086 - Minotaur Zombie (2F)
087 - King Mummy (2F & 3F)
088 - Medusa (2F & 3F)
089 - Rakshasa (2F & 3F)
Dragon Caves
The next stop to upgrade our classes would be to go to the Dragon Caves, where we will meet King Bahamut. These are the 5 small islands to the west of the Citadel.


Before meeting Bahamut, let’s clean up the chests in this area.
Start by landing on the easternmost island. Go down the hole and open the 7 CHESTS (141-147/249) in the 2 rooms in the cave.


Once you have those 7 chests, get back in your ship and land on the smaller island just northwest. This island does not have anything of interest, but go down the hole just to register it as an explored location (this may not be needed for the Adventurous Wayfarer trophy, but I would do it just to be safe).
Next, land on the southmost island with the marshy waters on it. Head down the hole and pick up the 3 CHESTS (148-150/249) from the room inside.


Next, fly over to the westmost island and go down the hole to find the final 3 CHESTS (151-153/249) of the area in the 2 rooms.


Now that you have every chest in this area, head to the island with 2 holes on it. Drop down into the hole on the right and follow the only possible path in the cave until you meet King Bahamut. When talking to him with the Rat’s Tail he will upgrade all of your character’s classes. This will get you the Token Of Courage trophy.


Here is a little rundown of some of the changes for each class!
Warrior → Knight
The Knight can equip stronger weapons and armor. It also gains access to White Magic up to level 3, allowing for useful support spells like Cure and Protect.
Thief → Ninja
The Ninja can now equip most swords and armor, greatly improving survivability. It also gains access to Black Magic up to level 4, including spells like Blizzara and Haste.
Monk → Master
The Master improves the Monk’s already high physical damage. While they still can’t equip magic or armor, their attack and critical hit rates scale even better with levels.
Red Mage → Red Wizard
The Red Wizard can now learn higher-level spells: White and Black Magic up to level 7. This gives access to powerful options like NulAll, Stona, and Warp.
White Mage → White Wizard
The White Wizard can cast White Magic up to level 8, unlocking some of the most powerful healing and support spells like Full-Life, Holy, and NulDeath.
Black Mage → Black Wizard
The Black Wizard gains access to Black Magic up to level 8, including devastating spells like Flare, Kill, and Break. They become true magic powerhouses.
Gaia
With our new upgraded classes, it’s time to continue our adventure. Next, let’s head to Gaia. This is a small town found near the north eastern peak of the continent.


Talk to some of the NPCs around town to learn about the missing Faerie.
Now for the main reason we are here. The shops sell some great spells and equipment for our upgraded characters. We have the upgraded version of Dia (Diaja), NulAll and Holy for our White Wizard. As well as level 8 Black Magic, like Stop for our Black Wizard. If you have a Red Wizard, you can also pick up Blizzaga. Just make sure you save 40000 GIL. We will need it for later.
Gaia Black Magic Shop (East)
- Blizzaga
- Break
Gaia White Magic Shop (East)
- Curaja
- Diaja
Gaia Armour Shop
- Ruby Armlet
- Protect Ring
Gaia Weapon Shop
- Cat Claws
Gaia White Magic Shop (North)
- Holy
- NulAll
- Dispel
Gaia Black Magic Shop (North)
- Stop
- Warp
- Kill
After upgrading your character’s equipment and spells, head out to the overworld.
Gaia Outskirts
Before we continue, there are a few new enemies that can be found just outside Gaia, so let’s take one of each out.
076 - Desert Baretta
078 - Wyvern
081 - Baretta
083 - Allosaurus


Caravan
Next, board your flying ship and head all the way to the desert in the upper left corner of the continent. Then look for a smaller patch of sand just north of the main desert. This is actually an area you can enter. In this are is a lone tent with a merchant inside. Talk to him and purchase the Bottled Faerie (this is why we needed to keep 40000 GIL).


Caravan Outskirts
Once you have purchased the Bottled Faerie, head out to the desert. Before we leave this area, walk around the desert to register a new enemy in the Bestiary.
077 - Sabertooth
Gaia
Now return to Gaia, where the Faerie will escape from the bottle and fly to the pond of water to the north of the buildings. Follow her there and talk to her to get the Oxyle. This key item will allow us to explore some underwater dungeons.


Onrac
Next, get back in your flying ship and head to the northwest part of the continent again. This time look for the small village of Onrac on the eastern shores. You will have to land your ship in a field to the south.


There are only 2 shops here, but one of them does sell Healaga for the White Wizard.
Onrac White Magic Shop
- Healaga
- NulDeath
Onrac Black Magic Shop
- Saber
- Blind
Other than that, talk to a few NPCs to learn about the Waterfall Cavern.
Waterfall Cavern
Leave Onrac and ride the river north to find the Waterfall Cavern behind the waterfall.


Inside the cave, make your way to the room in the lower left corner, where you will have to battle a few enemies. Then open the 6 CHESTS (154-159/249) and talk to the NPC to get to the Warp Stone.
Before leaving walk around the cavern and defeat at least one 108 - Green Dragon.
Sunken Shrine
Head back to Onrac and talk to the NPC on the pier to the east. She will take you to the next main dungeon (you will need the Oxyle key item).


On the first floor you can find 2 CHESTS (160-161/249). One in the room to the northwest and one in the room to the east.
Next, head up the stairs in the upper right corner. On this next floor you can find 5 CHESTS (162-166/249) scattered around a few rooms.


After collecting the chests from this floor, use the stairs in the bottom right corner to get to the next floor. This floor contains 13 CHESTS (167-179/249). One of them contains the Rosetta Stone key item. To get the 3 chests in the top right room, go to the top left corner of the floor and exit through the left.


Once you have the Rosetta Stone and cleared the floor of chests, head back to the first floor of the dungeon. This time, take the stairs in the top left corner of the floor and continue on the only path possible until you go through a room with 2 CHESTS (180-181/249) on 3F.
Exit the room with the previous 2 chests through the door at the bottom and then take the stairs. On the next floor, you will find the final 10 CHESTS (182-191/249) of the dungeon. You will also fight 096 - Sea Snake, 097 - Sea Scorpion, 098 - Sea Troll and 100 - Water Elemental when opening these chests.
Now that we have every chest in the dungeon, use the stairs in the top left corner to get to the next floor. Here, you will want to head west and then north through the big room. You will come to a small room with the Water Crystal and the 102 - Kraken boss.
This boss is weak to Lightning magic, but it also does not have great physical defence. At level 35, this boss only lasted a few turns by just spamming physical attacks and Thundara. To be safe, cast Healara with your White Wizard to keep the party’s HP up.


Before leaving through the blue portal, make sure you defeat at least one of each of the following enemies to register them in the Bestiary.
093 - Sahagin Prince (2F)
094 - White Shark
095 - Deepeyes (1F, 2F and 4F)
099 - Ghost (2F & 4F)
101 - Water Naga (3F)
Melmond
Now that we have the Rosetta stone, return to Melmond and talk to Dr. Unne, who can be found in the top right corner of the town. Thanks to the Rosetta Stone, he will teach you Lufenian, a dialect you need to know for our next location.


Lufenia
Next head to Lufenia that can be found on the stretch of land to the east. You will have to leave your ship near the desert to the north.


In Lufenia you can actually find 2 magic shops far to the north east. They sell really powerful Level 8 spells.
Lufenia White Magic Shop
- Full-Life
Lufenia Black Magic Shop
- Flare
Since we now know the Language of the Lufenians, talk to the NPC in the bottom right area. She will give you the Chime key item. This will allow us to head to the next main dungeon.


Mirage Tower Outskirts
Once you get the Chime, head to the massive desert to the north. In the centre of the desert, you can find Mirage Tower. Before heading in, walk around the desert outside and defeat one of each of the following enemies for the Bestiary.
085 - Sand Worm
103 - Tyrannosaur


Mirage Tower
Head inside the tower and go through the door right above you. In this big room, you will find the first 8 CHESTS (192-199/249).
After opening the chests, proceed through the bottom-left door and ascend the stairs to the next floor. On this floor, make your way to the central room by going around the outside of the floor anticlockwise. Inside, you will find the other 10 CHESTS (200-209/249).
Next, take the stairs to the north of the room with the chests. Then enter the room in the middle and fight the 107 - Blue Dragon mini boss. After you defeat him, you unlock the teleporter to the Flying Fortress.
Before heading to the flying fortress, make sure you defeat one of each of the following enemies for the Bestiary in the Mirage Tower.
104 - Black Knight (1F)
105 - Chimera (1F & 2F)
106 - Guardian (1F & 2F) - Can be a little rare and can also be found in the next area (Flying Fortress).
Flying Fortress
Once you are done in Mirage Tower, head to the teleporter behind the mini-boss to get to Flying Fortress. Just be aware that if you leave the Flying Fortress at any point and want to return, you will have to traverse Mirage Tower again.
If you have followed this guide as soon as you arrive, you should unlock the Adventurous Wayfarer trophy for visiting every location on the map.
On the first floor, explore the rooms to the south, west and east to get the first 10 CHESTS (210-219/249).


Once you have opened the chests, head north and through the teleport to get to the next floor. On this floor, there are 4 rooms with 9 CHESTS (220-228/249) inside.

Before leaving this floor make sure you go to the southwest room and pick up the Adamantite. We will need this to craft the Excalibur and the Sword of Myth trophy later.


After picking up the Adamantite, head through the teleporter to the south to get to the next room. Here you will find the last 14 CHESTS (229-242/249) of the dungeon in the rooms to the north, east and west.


Head through the teleporter next to the western room. On the next floor, head north and take the second left to find the teleporter to the final floor. On this floor, for now, head north to find the Wind Crystal and 119 - Queen Tiamat.
This boss can be a step up in difficulty compared to the previous bosses. She can do 200+ dmg to the whole party with Blaze, so make sure to always have high HP and maybe cast spells like NulAll with your White Mage to negate damage. She also has high defence against spells. So buff your melee fighter.


After defeating the boss, we will have purified the final Crystal. The teleporter to leave the dungeon will also appear in this room. However, before we leave, we want to clean up a few things in this dungeon. First, defeat the following enemies at least once to register them in the bestiary.
080 - Manticore (1F-3F)
106 - Guardian (3F & 4F) - If you couldn’t find one in the previous dungeon.
109 - Stone Golem (2F & 3F)
110 - Air Elemental (1F, 2F, 4F And 5F)
111 - Spirit Naga (1F, 2F, 4F And 5F)
112 - Death Knight (1F & 2F)
113 - Earth Medusa (1F & 2F)
114 - Black Flan (1F, 2F And 5F)
115 - Soldier (3F & 4F)
116 - Vampire Lord (3F & 4F)
117 - Dark Fighter (3F-5F)
After registering those enemies in the Bestiary. There is one more chance encounter in this dungeon. However, this enemy is more of a boss that can spawn at random. It can only spawn on the bridge just before the Wind Crystal on 5F and is extremely rare. The 118 - Warmech has around a 1% chance of spawning. As this will probably take a while, unless you are VERY lucky, you will probably get to level 50 with all party members and get the Seasoned Hero trophy as you try to find the Warmech. This is one of the strongest enemies in the game, and I recommend that your party have at least level 55 or higher to take him on. Make sure you are always keeping your character’s HP high after each random encounter, since if you come across this boss, he has an attack that can do 300+ damage to the whole party at once. The first thing you need to do is buff defences and then use the White Wizard to heal every turn just to be safe. This enemy only has 2000HP but does heal 100 at the end of every turn. If you are struggling with this boss, you can always come back later.


Getting Excalibur
After cleaning everything up in the Flying Fortress, we can go to the final dungeon of the game. However, there are 2 things we want to do first.
The first of those two things is to return to Mount Duergar and talk to the NPC in the northern room. Since we have the Adamantite from the Flying Fortress, he will make us the Excalibur, the best weapon in the game. This will also get you the Sword of Myth trophy.


Secret 15 Puzzle Minigame
There is one last thing to do before heading to the last dungeon. And that is to “play” the secret 15 Puzzle Game to get the Hidden Game trophy. You can start this game by getting on your ship (not the flying ship) and then HOLDING X and then keep pressing CIRCLE without moving. After pressing it about 20 times or so, the minigame will start and the trophy will unlock. You don’t have to finish the minigame for the trophy, and it does not give you anything in-game for doing so anyway.


Chaos Shrine
With everything else out of the way, the only thing left for us to do is head to the final dungeon. It’s time to return to the Chaos Shrine.
Once inside, head to the centre room and interact with the orb. This will take you to the past, where you can explore more of the Chaos Shrine.


On the first floor of the past version of the Chaos Shrine, walk around until you defeat one 122 - Purple Worm to add it to the Bestiary.
Next, use the stairs in the southeastern corner of the floor to move to 2F. This is a small area, but before heading up the stairs to the right, walk around until you defeat one 120 - Rhyos to add it to the Bestiary.
Once you have defeated a Rhyos, head up the stairs on the right. On the next floor, head to the room in the middle where you will have to fight a 121 - Death Eye as soon as you walk in.
In this centre room you will also find 2 CHESTS (243-244/249).
Once you have opened the chests, interact with the stone tablet in the middle. This will unlock a ladder going down.
Take the ladder to move to 2F. Here, take the stairs in the northwest corner to 1F. Next, take the stairs in the northwest corner to get to B1.
On B1, go to the lower right corner where you can interact with the orb and then you will have to fight 124 - Lich. Yes, just like any other true classic JRPG, you will have to fight stronger versions of all the previous bosses.
After defeating him, go down the stairs to B2. Here, go through the door to the northwest and make your way east and then and then south to come back out into the main room. Before interacting with the red orb, go south and then take the east and west paths to find a total of 4 CHESTS (245-248/249).


After collecting the 4 chests, interact with the red orb to fight 125 - Marilith.


After the boss fight, go down the stairs to B3.
On this floor, make your way through the rooms to get to the blue orb found on the stairs in the southeastern corner of the floor. Interact with the blue orb to fight 126 - Kraken.


After defeating the Kraken, go down the stairs to B4.
On this floor, you can find our final random encounter enemy to register in the Bestiary. This is 123 - Iron Golem (you won’t get the trophy yet since we still have 2 bosses left).
On this floor, you can also get the final CHEST (249/249) in the game. You can find it in the room to the southeast of this floor, and it contains the Masamune, one of the best, if not the best, weapons in the game. This will get you the Legendary Treasure Hunter trophy.


Now interact with the green orb covering the stairs in the upper right corner of the floor and defeat 127 - Tiamat.


After defeating the enemy, head down the stairs to B4.
Before heading into the central room where the final challenge of the game awaits, make a quick save and heal up. Make sure every character has their best possible equipment.
Once you are ready, 128 - Chaos, the final boss of the game, can be found in the central room.
This boss can be a bit of a challenge, so don’t hold back and use every powerful item you have. Chaos has a lot of HP, and if you are unlucky, he can cast Curaja multiple times (each time he will heal 9999 HP). Make sure your character’s HP stays well above 400HP at least, so use your White Wizard exclusively to heal and revive. Use the Giant’s Glove item to cast Sable and boost your character’s physical damage. Also, use Haste when possible. Depending on your luck and how many times he casts Curaja, the battle can last from 6 or 7 minutes to anywhere over 20.


Once you defeat Chaos, you will receive the Field Research - Professional trophy for completing 100% of the Bestiary.
Then, after the credits and returning to the title screen, you will get the Prophecy Foretold trophy for defeating Chaos as well as the MASTER OF I platinum trophy!
Congratulations, and I hope this guide was helpful!